HDMI Capture and Analysis FPGA Project 5
Part 5 / 6: Build your own HDMICAP
Since HDMICAP was designed as a one-off tool to scratch an itch, the only version of it is basically a prototype.
So there is no support on the Z-turn dev board for hdmi input, and it was unclear if the whole thing would even work when I started out.
For that reason I chose the basically cut up an hdmi cable and wire it to the Z-turn by hand. Even if you are motivated to make the simple PCB necessary to remove this step, you will probably want to do this one time for the same reason, to confirm everything works.
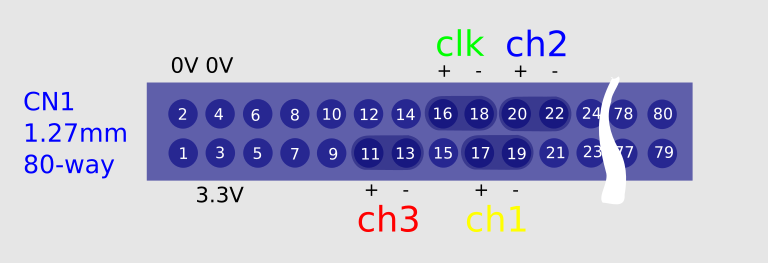
Z-turn connector
Everything connects to one 80-pin connector on Z-turn, all at one end of it. Only the TMDS data capture is supported right now, so with the exception of shorting hpd to 5V so the source hpd feels he is connected, signals unrelated to the TMDS data are currently unconnected.

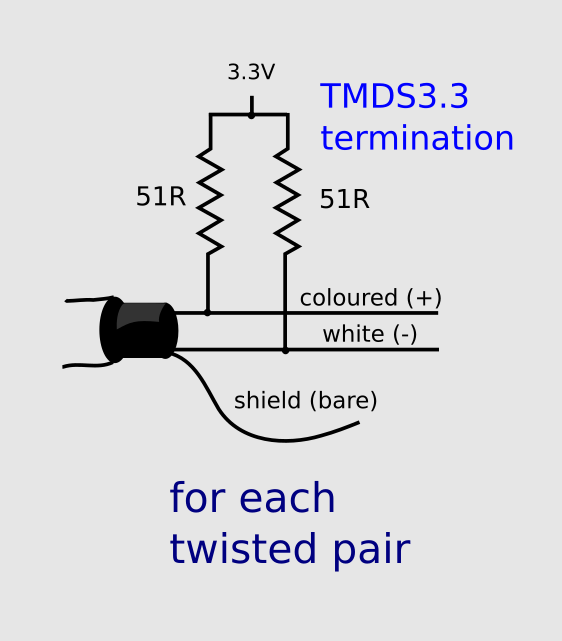
Basically then we need to hook up four differential pairs and for each of + and - in the pair, provide 51R termination to 3.3V from the connector.

First apply some insulating tape to the back of the Z-turn board so you won't accidentally short anything.
When you cut the HDMI cable, you will find 19 conductors plus an outer braided shield.
The differential pairs are twisted together and separately shielded; there's an uninsulated individual shield wire along with the differential pair.
Before soldering anything, you must lay out the cable and firmly anchor it to the zturn board using cable ties on at least two mounting holes at right angles preferably. It's because of the weight of the hdmi cable and the fragility of the soldered connections, we cannot allow any flex or twist in the cable to get near the soldering.
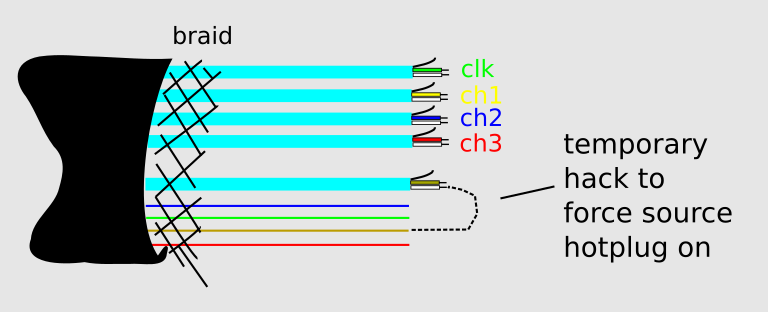
The pairs consist of a white wire (- in the pair) and a coloured partner (obviously, +). The colour indicates which pair it is as below...

As shown the brown wire (5V) needs to be shorted to the white wire in the spare pair (hpd).
The last step is hook all the shields (the individual pair shield wires, and the outer braid) and connect to 0V on CN1 connector.
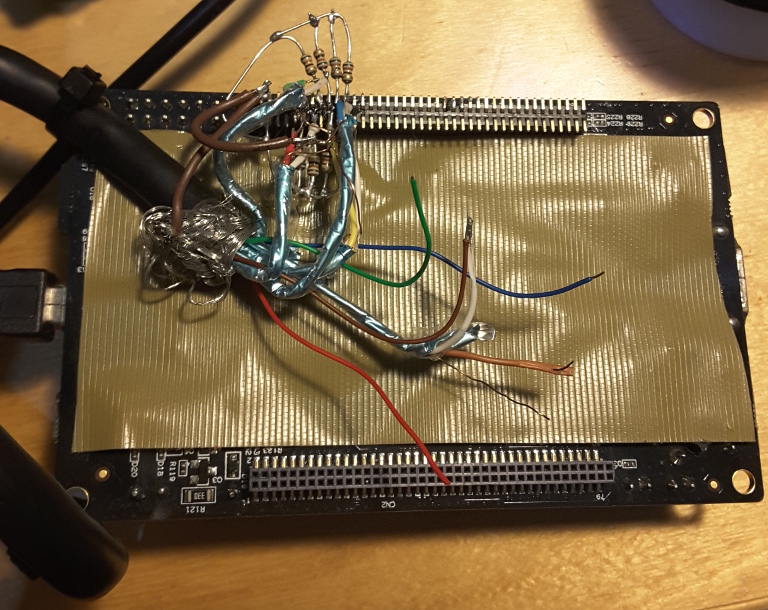
You must keep the wire lengths the same during this and as short as possible, the end result should look something like this...

It's not going to win any beauty contests but it should take about an hour, cost almost nothing, and assuming you wired it correctly, it works and has enough data integrity for 720p as well.
HDMICAP software
kernel
Z-turn comes with a uSD card with an old kernel.
HDMICAP uses a mainline kernel 4.2-rc8 with both the hdmicap kernel driver added and a heavily fixed driver for Xilinx's generic dma IP, which is not in mainline and completely broken in the versions sent on lkml and in Xilinx's own kernel repo.
You can find the kernel git repo here
hdmicap userland app
The userland app is written in C and is easist native-built. It has one dependency on current libwebsockets.
hdmicap git repo is here and libwebsockets is here
fpga firmware
The fpga firmware is a bit difficult to provide as a project since it's intimately connected with nonfree Xilinx IPs to make it work.
here is a tarball of fpga bitsream and kernel binary pieces to configure hdmicap fpga and boot to a matching mainline kernel.
A git repo with the vhdl for hdmicap function itself that I wrote is here but this is incomplete in terms of reproducing the bitstream. If there's enough interest I'll try to figure out how to share the whole project in a way the Xilinx IPs can be added back in so it's buildable.
Continued
The the last part in this series discusses what I found about Hikey / 96boards using the hdmicap analyzer.
