ESP8266 Wifi module on Linux
ESP8266 basics
I have had a bunch of Espressif ESP8266 modules since last year, getting started with them seemed very difficult. Yesterday I looked at them again and got somewhere with them.
There are many pages already with pieces of information about ESP8266, and some great guys have been all over it reversing the bootloader a while ago. However it took me a while to get enough info for using my modules on Linux, and to understand what the modules are and aren't inside.
So this page will try to document the basics in one place for people wanting to use the modules on Linux.
Architecture
The chip uses an RTL core from Tensilica, this has been around since forever (at least before 2000 when I was at Emosyn). It's a cheap and cheerful RISC core. Toolchains exist for it in gcc, it's broadly a similar deal to working with Arm Cortex, but a little bit more customizable in terms of being able to configure the RTL to have optional instructions or not. But the hard work for matching the toolchain to that has already been done.
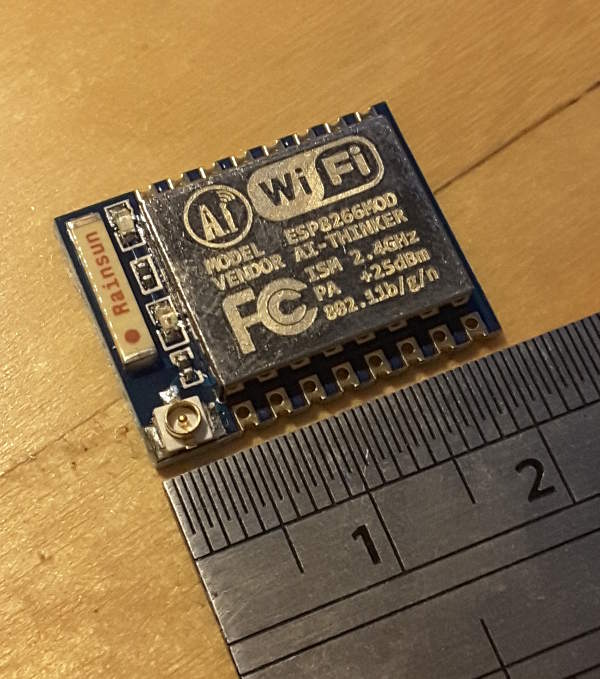
The chip expects an SPI flash companion chip, in the "07" version of the modules I have to get started with, the SPI flash is 8Mbit (1MByte).
There is a ROM bootloader inside the chip that allows reflashing SPI over serial. So you can't brick it.
For normal boot, a second bootloader is pulled from SPI flash (at offset 0) by the ROM bootloader and executed. If you GND GPIO0 though, the ROM bootloader enters the "reflash over serial" path and waits to be connected to.
The second level bootloader pulls in the main code from flash
The main code is flashed in two pieces, at offset 0x1000 and 0x81000. Images from Espressif come in two pieces accordingly
The firmware is not all open but is actively developed. Since old versions of it ship on the module, the first job is set yourself up to be able to reflash it.
Required module connections
The module requires 0V (GND) and 3.3V power. There are many dire notes about needing a dedicated LDO because the module can pull a lot of current, however here the module works fine with 30cm of wire for 3.3V power and ground coming from the expansion connector of an Raspberry Pi 3, with a 10uF Tantalum at the module. YMMV but it doesn't seem so critical as told elsewhere.
RST may be left open, the module has it pulling up a cap inside already. You can force it to 0V to make a reset happen.
EN must be pulled up or tied to 3.3V
GPIO10 should be tied to 0V
GPIO0 can be left unconnected for normal boot, or forced to 0V to select flashing from the ROM bootloader
There's a two-wire UART interface on the module using 3.3V signalling. Modern USB-serial converters are typically 3.3V already, although older ones using 5V signalling are unsuitable.
Baud rate nonsense
From boot, in the ROM bootloader and the second stage bootloader, the chip's baud rate on serial is a completely nonstandard 74880bps. Most normal serial ports can't do that, however serial - USB adapters usually have a very flexible baud rate generator and can handle it. Even so, most serial terminal applications cannot express such random baud rates, eg. minicom can't do it. gtkterm did it once (?) and never again, it stuck at 9600 even while displaying 74880 in the UI.
pyserial package has a python terminal emulator that can do it, if your USB adapter can do it.
miniterm.py /dev/ttyUSB0 -b 74880
If you're debugging what is going wrong from boot, you need the funny baud rate. But modern firmwares that run after the second stage bootloader change the baud rate to 115200, so if you avoid problems in early boot using the info following, you can stick at 115200 and just see some junk coming at module reset.
What it's actually saying (at 74880bps) during a normal boot looks like this
ets Jan  8 2013,rst cause:2, boot mode:(3,6)

load 0x40100000, len 2408, room 16
tail 8
chksum 0xe5
load 0x3ffe8000, len 776, room 0
tail 8
chksum 0x84
load 0x3ffe8310, len 632, room 0
tail 8
chksum 0xd8
csum 0xd8

2nd boot version : 1.6
 SPI Speed      : 40MHz
 SPI Mode       : DIO
 SPI Flash Size & Map: 8Mbit(512KB+512KB)
jump to run user1 @ 1000

rf cal sector: 251
rf[112] : 00
rf[113] : 00
rf[114] : 01

SDK ver: 2.0.0(656edbf) compiled @ Jul 19 2016 17:58:40
phy ver: 1055, pp ver: 10.2
At the end it switches to 115200 and says
ready
and will accept AT commands. Note some terminal emulators don't send suitable things for CRLF, in that case try Ctrl-J to end the line.
From a terminal emulator in 115200bps mode only, the end result is a spew of junk and then the word "ready".
In text from the ROM bootloader boot mode:(3,6), the 3 indicates GPIO0 is pulled high for normal boot. If you hold GPIO0 to 0V, this changes to boot mode:(1,6) and the ROM bootloader enters the path for flashing the SPI instead of normal boot.
Areas in the SPI flash
- 0x0000 second stage bootloader
- 0x1000 first part of application
- 0x81000 second part of application
Then there are two areas that go at the "end" of the SPI flash, the addresses shown are for the 8Mbit SPI flash on my module, for 16MBit, they are +0x100000
- 0xfc000 wifi calibration dramatically
- 0xfe000 dunno but it needs setting to 0xff
Using Linux commandline tools to flash the module
There is a python flasher here that works well.
https://github.com/themadinventor/esptool
You can install it using pip as mentioned in its readme, but since pyserial is packaged in Fedora I installed that dependency from the package.
I got the current-at-the-time-of-writing binary "NONOS" SDK image from here http://bbs.espressif.com/viewtopic.php?f=46&t=2451 unpacked it and navigated to ./bin/at/512+512/
You must exit your terminal emulator while doing this or it will compete for reading the serial data esptool.py wants to read.
esptool.py --port /dev/ttyUSB0 --baud 115200 write_flash --verify -fs 8m \
 0x00000 ../../boot_v1.6.bin \
 0x01000 user1.1024.new.2.bin \
 0x81000 user2.1024.new.2.bin \
 0xfc000 ../../esp_init_data_default.bin \
 0xfe000 ../../blank.bin
At the end, it should says
-- verify OK (digest matched)
Afterwards stop forcing GPIO0 to 0V and either cycle the power or take RST to 0V briefly to come up in the application firmware at 115200 (after the inevitable junk from the ROM + second stage bootloader at 74880 baud first), and say "ready".
AT commands to connect to AP
ready
AT+CWMODE=1

OK
AT+CWLAP
+CWLAP:(3,"myap",-77,"4c:e6:76:c4:e7:b8",11,-29,0)
+CWLAP:(3,"happycat",-78,"5c:f4:ab:70:52:18",11,-7,0)

OK
AT+CWJAP="myap","mypassword"
WIFI CONNECTED
WIFI GOT IP

OK
AT+CIPSTART="TCP","192.168.2.253",22
CONNECT

OK

+IPD,21:SSH-2.0-OpenSSH_7.2
The AT based fw is the default but it turns out it's not at all the best way to use the chip, for that you need to build an application firmware from scratch. You must build the toolchain and the actual application, but that is surprisingly simple it turns out since all the main grunt work has been done.
Homebrew firmware - Toolchain
Clone this https://github.com/pfalcon/esp-open-sdk
and follow the build instructions. For Fedora, as mentioned in https://github.com/pfalcon/esp-open-sdk/pull/56/commits/464e275e6a18ef31a8381839d87abdd69f4878b4 the following packages will be needed.
sudo dnf install make unrar autoconf automake libtool gcc gcc-c++ gperf \
   flex bison texinfo gawk ncurses-devel expat-devel python sed \
   help2man python-devel pyserial
I chose the "include the SDK" build option and after some minutes it completed the build OK on Fedora24.
Set PATH to point to wherever you cloned the Toolchain
export PATH=/projects/esp-open-sdk/xtensa-lx106-elf/bin/:$PATH
That's it to get started with the toolchain.
Homebrew Firmware - application
I was really surprised that there is already a FOSS (MIT licensed) application in < 400KB with basically all the features needed (in a bare way, but still, this is an amazing boon). The author seems to have put together things from other projects, but it seems all FOSS.
Clone this https://github.com/israellot/esp-ginx
Edit line 8 of ./Makefile to point to your toolchain bin dir from earlier.
XTENSA_TOOLS_ROOT ?= /projects/esp-open-sdk/xtensa-lx106-elf/bin/
After that just make. He built without errors here.
Using the esptool from earlier, we can blow everything in one step
esptool.py --port /dev/ttyUSB0 --baud 115200 write_flash --verify -fs 8m \
0x00000 bin/0x00000.bin \
0x10000 bin/0x10000.bin \
0xfe000 bin/blank.bin \
0xfc000 bin/esp_init_data_default.bin
The core application is taken from some smart relay project. It runs the ESP8266 in both AP and station modes, and allows you to select and authenticate to another AP. It also has some kind of websocket serving support, but something about it is broken since it logs
http_ws_cgi_execute c =0x3ffea500
websocket frame size 520
    Invalid frame type 07
    received invalid frame
Opcode 7 is reserved in RFC6455... anyway that's a great start, I thought doing stuff like making the station connection and keeping it nailed up would have to be done by hand. I guess the next step is study the pile of code.
Special constraints
ESP8266 has one big advantage on the constraint front, a relatively huge SPI NOR flash used to store code and data. Even on my old modules from 2015 that is 1MiByte, and on recent modules it's 4MiBytes.
Allowing that half of it will need reserving for processing updates, 2MiBytes is still a lot of space for this kind of device. The whole image for example from the esp-ginx image is only 350KiB.
However there are problems. Of the main two issues, one can be imagined, there is only 80KiB of SRAM on the whole device. Typically there is around 30KiB of heap left after init.
The much less expected problem is that the ROM copies the first 0x9000 (36KiB) of flash to SRAM and jumps into it, for unknown reasons it seems the global .rodata section is required to be in there (!)
Any code that operates the SPI flash has to be in there as well, because it can't mess with it while executing from it.
Update
Edit: the bad opcode thing is a bug, the websocket "cgi" code receives a first packet which is actually the GET / HTTP headers, 0x47 for G of GET is parsed in ws protocol to get opcode 7. However the code (illegally) ignores it and continues on. With small packet sizes (32 bytes) the lwip stack falls over with OOM, like this https://github.com/micropython/micropython/issues/1971 It seems related to how many connections are coming at lwip, which is a bit worrying for robustness (the http / websocket parser stuff also looks a bit shaky).
I threw out their http arrangements and replaced it with lws, which I will discuss in another post.